Crystal Candy Memoir Stencilled Board Tutorial

Crystal Candy Memoir Stencilled Board Tutorial

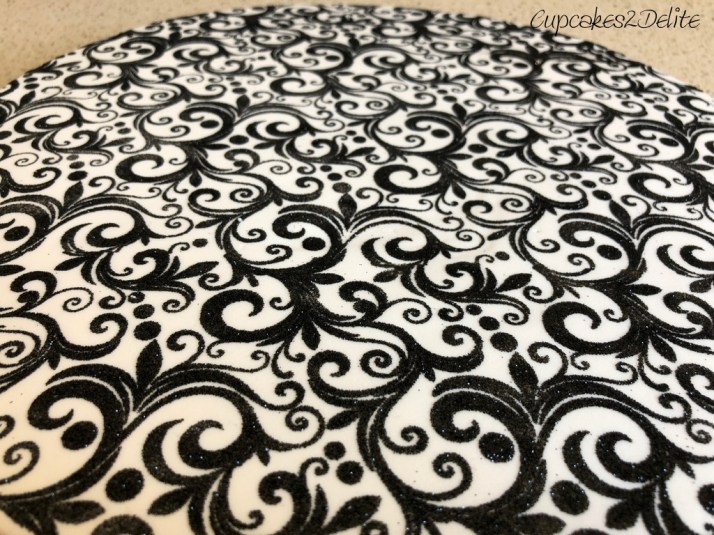
After posting photos of a Swirls and Roses 50th Birthday Cake I made recently, I had a few inquiries as to how I had decorated the cake board. This is a simple tutorial which I hope helps you create some beautiful cake boards. Remember your cake board is like the perfect “pair of shoes” to complete your cake and no cake should be presented ‘barefoot’ to any client.

Crystal Candy Memoir Stencilled Board Tutorial

I first covered my board in white fondant and allowed it to dry overnight. I placed the Crystal Candy Memoir Stencil across the middle of the cake board first and completed the steps that I am about to explain to you. The reason for doing the middle first is that once it has dried you are able to do the sides one after the other with no fear of smudging.

Crystal Candy Memoir Stencilled Board Tutorial

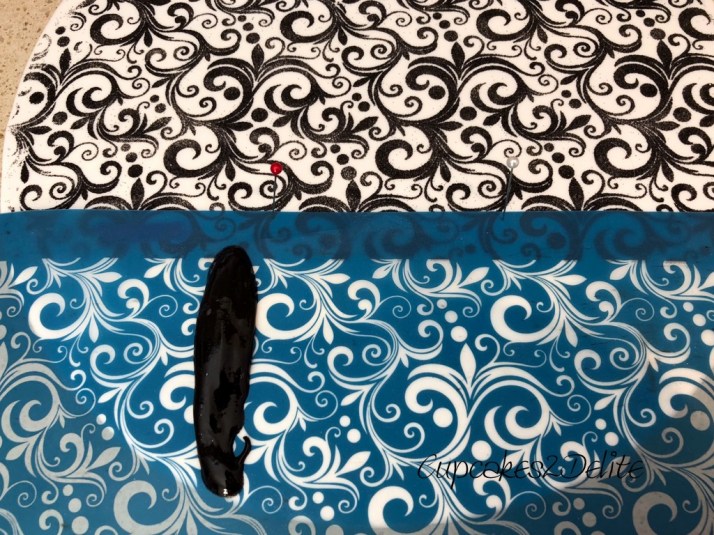
Once the middle section has dried, line up your stencil so as to complete the design on one side of your board and pin to your board. I pinned in an area I knew would be covered by the cake. You could also pin in an area already covered by a swirl to masterfully disguise any pin marks (see the red pin).

Crystal Candy Memoir Stencilled Board Tutorial

I chose piping gel to which I had added concentrated black Rolkem powder for this cake board but Crystal Candy Stencils can be used with royal icing or a mixture of royal icing and piping gel as an alternative. I love the ‘phone a friend’ option whenever I am in doubt and as usual Ray from Crystal Candy was ready to give advice. In this case she said I would need to use a very concentrated black piping gel in order to achieve a black stencilled board. I thought mine looked concentrated enough, however you will see that with black you have to mean business when it comes to colouring anything!

Crystal Candy Memoir Stencilled Board Tutorial

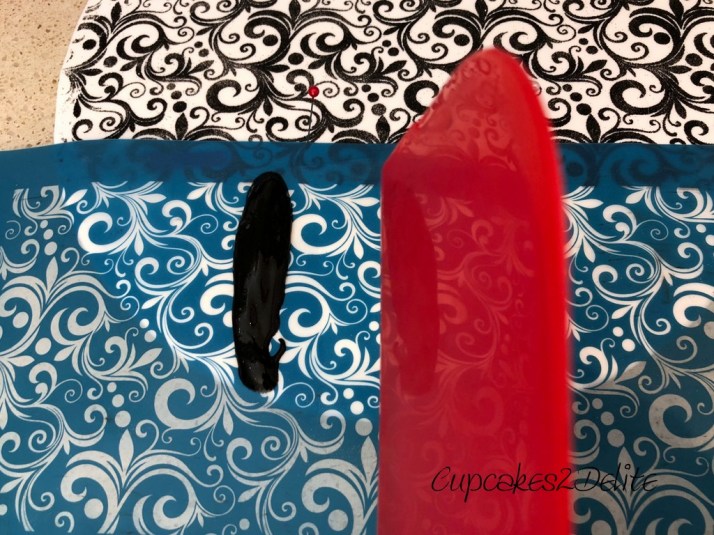
Pop a generous dollop of the piping gel over your stencil and grab your versatile cake scraper.

Crystal Candy Memoir Stencilled Board Tutorial

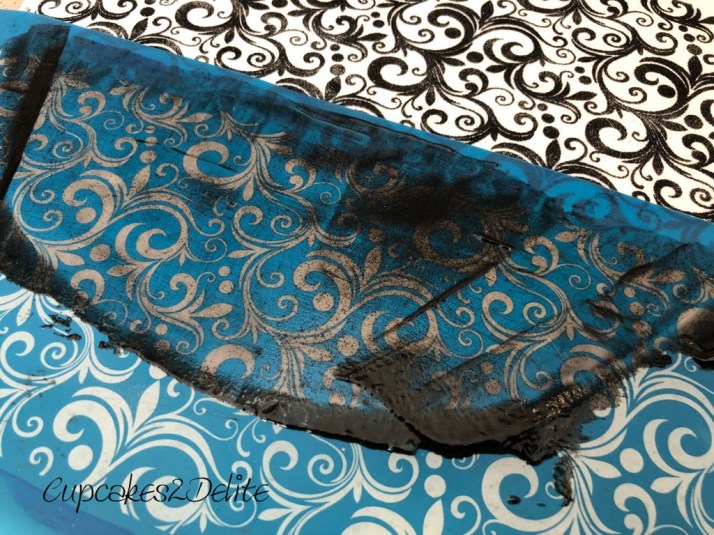
Pull the gel firmly across the stencil so that all the design areas are covered. Make sure here not to move your stencil in the process as you don’t want any smudges to ruin your beautiful board. Also remember not to go over the stencil onto any completed areas of your board.

Crystal Candy Memoir Stencilled Board Tutorial

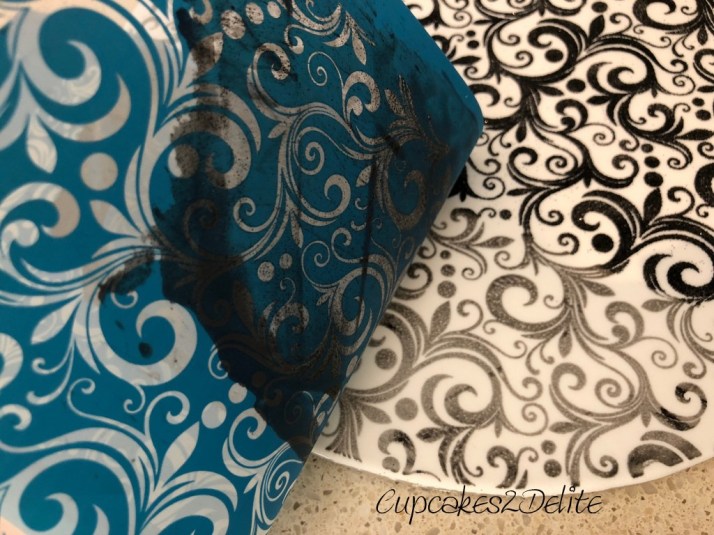
Gently hold your stencil in place and remove all the pins. Carefully peel back the stencil away from your cake board and admire your stencil work as it is revealed. Going back to the colour, you will see here that my  black piping gel did not have enough pigment in  it, and it created a dark grey design instead of the inky black I envisioned for my cake design.

Crystal Candy Memoir Stencilled Board Tutorial

I decided here that it was not a good idea to let tears drop onto my board and there was no time to start my board again so I pulled out my sparkle dusts and found Rolkem’s Raven Sparkles to sprinkle over the wet gel design. This is easier if you do it over a sheet of baking paper as you can tip the board and gently knock any loose dust off the board. Fold the baking paper and then return any extra sparkles to their glittery home.

Crystal Candy Memoir Stencilled Board Tutorial

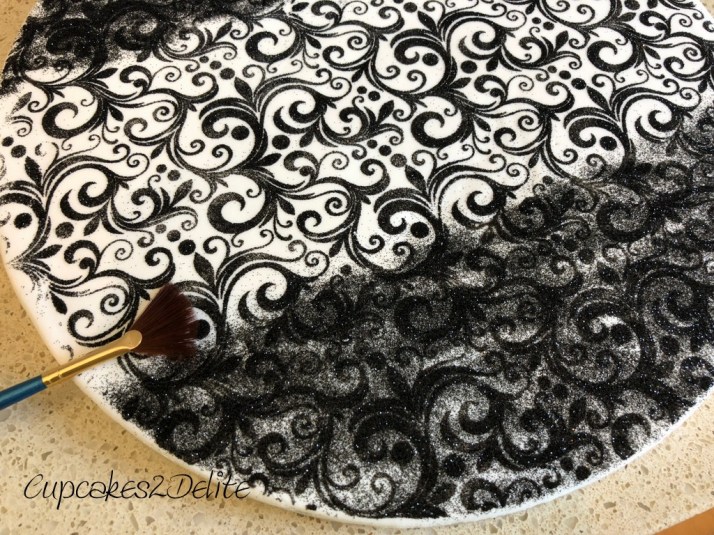
I washed my stencil at this stage and hung it over the edge of my counter to dry before using it to repeat these steps on the other side of my board. Ray suggested a feather to dust off the remaining glitter but with no feathered friends to defrock, I used this really soft fan brush. I remember in my first demo by Andries of Rolkem about 5 years ago…..in the days when I used to wander into Jodees not knowing the difference between a concentrate and a sparkle….Andries said he had been given a brush exactly like this one and it proved to be perfect for ‘feather’ dusting.

Crystal Candy Memoir Stencilled Board Tutorial

This is the stage where if you are an extrovert you will dance and if you are an introvert you will become an extrovert immediately! I am never shy to do this happy dance even though I may get strange looks from my family, as I believe there is no harm in a dash of this happiness  sprinkled over my work!

Crystal Candy Memoir Stencilled Board Tutorial

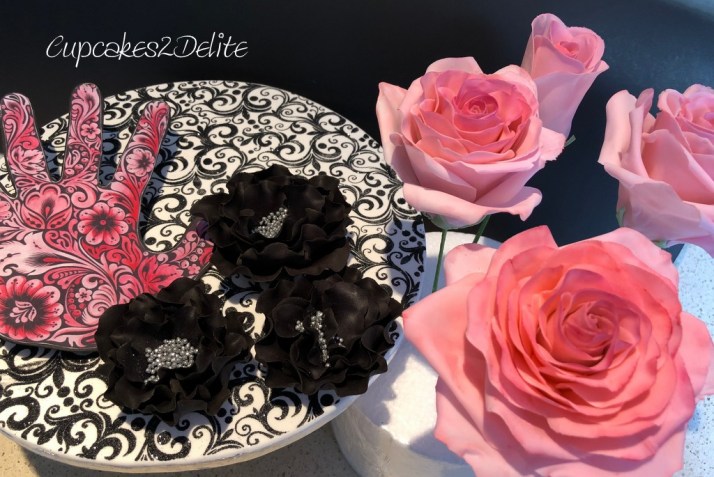
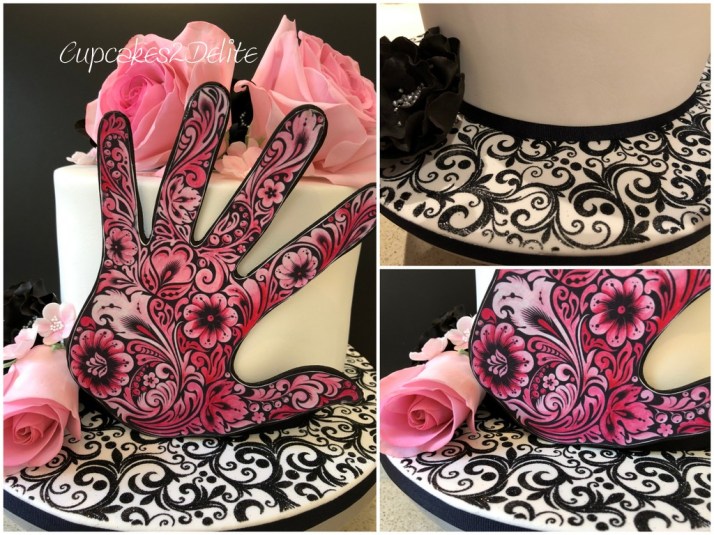
Here I have assembled all my decorative elements, including the swirled cake board,for this cake before popping the fondant cake onto it. The final step was ribboning my board with a deep black ribbon which really makes the swirls pop on the board.

Thank you to these amazing suppliers:

Crystal Candy for your amazing collection of stencils…I can’t wait to try out another design!

Rolkem for the Raven Sparkles to my rescue.

Jodees for the edible printed image of a hand I had coloured in for this design.

Crystal Candy Memoir Stencilled Board Tutorial

Please feel free to Like this tutorial or pop a comment if you have any questions regarding any of the products I used.

Wendy’s Roses Then(2013) & Now(2017)

Wendy's Rose Cake Topper

Even if I had had a crystal ball in 2011, when I started Cupcakes2Delite, I could never have predicted how my friends would become an intricate part in the story of my business. The fun, the learning and the inspiration I have received from them is woven into the history of the writing of this blog.

Wendy's Rose Cake Topper

Wendy celebrated her 50th Birthday in the September of 2013, and she asked me to do her birthday cupcakes with a blue roses theme. I made her cupcakes and as a small gift added a 6 inch cake with a topper of blue & white roses, a butterfly & flowers on embossed sugar paste (pictured below). I blogged the birthday cake and cupcakes in a post Beautiful In Shades of Blue. In 2013, I had very little experience in the art of sugar flowers and didn’t even know what flower paste was. I was really proud of this little work of art though and it meant so much to Wendy that she kept the topper until last year when she asked me if I could redo it for her as it was looking a little sad!

Wendy's 50th Cake & Cupcakes 2013

Wendy’s 50th Cake & Cupcakes 2013

Wendy's Rose Cake Topper

Here is the same topper renewed and upgraded in 2017. I kept the topper to a tiny 5 inch size to fit into the glass display dome (thanks Ivana for spotting the perfect dome…..my friends even know what I am looking for when they are out shopping!)

The reward of seeing the growth in my sugar skills cannot surpass all the years of friendship with Wendy, but how awesome that the years of friendship have inspired the contrast of these 2 sugar pieces. Thank you Wendy for trusting me all those years ago with your birthday cupcakes and for loving something so simple that I had made for you, that you wanted it again to keep for another few years. I am honoured that this tiny rose display in its glass dome will think it is a sugar jewel sitting amidst your precious Swarovski pieces!

Wendy's Rose Cake TopperWendy's Rose Cake TopperWendy's Rose Cake TopperWendy's Rose Cake Topper6Wendy's Rose Cake TopperWendy's Rose Cake TopperWendy's Rose Cake Topper

Wendy Figurine on Books

Wendy Figurine on Books

As 2018 starts, I find I have a few cakes and sugar pieces that I still have not blogged, however the new year is always a time of reflection of the year that has just swiftly wizzed by, mixed with the anticipation of the beginning of a new chapter. My life, and not just my sugar life, is recorded in special anecdotes on my Cupcakes2Delite blog which you are now reading. Initially I started this blog because I wanted to leave behind some sort of photographic legacy of what I had learnt to create. It then quickly changed into a way that I could show my appreciation for the family and friends in my life and has now shown me just how much I have evolved in these years as a sugar artist.

Wendy Figurine on BooksI paid tribute to my blogging guru, Wendy, in Jan 2014, in my post about the Wine Fairy I created for her birthday. The little Wine Fairy captured the character of Wendy with her black bob and red and black outfit. Wendy kept this little figurine all the way to 2017, when she finally true to her name became ‘legless’ (the figurine that is and not Wendy)!!!

Wine Fairy Figurine for Wendy, Jan 2014

Wine Fairy Figurine for Wendy, Jan 2014

With my anticipation for 2018, came the need to say a thank you in the form of an ‘updated’ Wendy figurine for Wendy as all my hours of baking, designing, creating, photographing and writing would not have been recorded if it wasn’t for this blog that Wendy patiently taught me how to set up. Thank you Wendy for sewing that blogging seed in my brain and making it seem like an intriguing way to record my story. Not only has it been fun to write my own posts but it has been fun to be invited to write guest posts on other blogs.

My 2018, Modern Day Wendy Figurine, had to show the Wendy we know today.  You will be pleased to see Wendy, that  you have developed a gorgeous decolletage since 2014,  and your little figurine is showing off your brand new funky, spikey hair style (thanks to Craig and his magic scissors), a sassy new figure and of course most importantly your love for books! I chose the last 3 books you excitedly posted on facebook as a pretty perch for your sugar butt. Thank you for all the gorgeous books, old and new, that you choose for us to read, it certainly makes my literary life that much more interesting!

Wendy Figurine on Books

Thanks to you, I have been able to share my blogging knowledge and encourage others to use blogging as a business tool for their sugar and other work. Thanks to you the pages of my life have a way to be shared with my family, friends, clients and teachers. Enjoy your new little Wendy and here’s to 2018 being a fantastic sequal to 2017!


Wendy Figurine on Books

Wendy Figurine on Books

Wendy Figurine on Books

Sugar Paste Figurines

Now and Then Wendy Figurines

Bo’s 21st Cake

21st Birthday Hat Box Cake

What a pleasure it was to create this cake for Bo for her 21st.  The photos Stephanie, her mom, sent to me showed a beautiful, poised and elegant young woman and it was fun to translate these characteristics into a sugar paste figurine for her 21st Cake.  I had to create long eyelashes, silky brunette hair and a gorgeous curvaceous figure dressed in a sexy deep coral dress.  Bo’s sister, Amy, also wanted me to add on pretty jewelry.  It is all this love and understanding that my clients show for the person who is celebrating that make me want to create the perfect cake for them.

21st Birthday Hat Box Cake

Stephanie and Amy’s idea was to have a Hat Box Cake with their beautiful Bo sitting on the box. As Bo was completing her course in BConsumer Science in Clothing and Retail Management, I thought it would be great to add details reflecting her passions. The cake board I covered in embossed sugar paste with movement on the board to reflect fabric. I added my favourite Crystal Candy Lace I made using Crystal Candy Midnight Garden Lace mat, which I dusted a soft gold.  Gold and silver antique scissors, gold buttons and rolled ‘fabric’ coral roses, a coral rose and a name tag completed Bo’s Coral and Gold Hat Box Cake.

21st Birthday Hat Box Cake

Not only was this cake delectable looking but inside revealed a chocolate cake, layered with raspberry buttercream and coated in chocolate ganache. On collecting the cake, Stephanie and Amy loved the cake and I was delighted that they had trusted me with their order.

Stephanie … ” Thank you Lisa for this beautiful cake, we loved it. “

21st Birthday Hat Box Cake21st Birthday Hat Box Cake21st Birthday Hat Box Cake21st Birthday Hat Box Cake

‘Fantastical’ Bug Cupcakes

Cute Bug Cupcakes

I am not sure if this post is about keeping it all in the cupcake family or keeping the family in cupcakes, as Michelle trusted me with yet another order for a family celebration. This time it was Cute Bug Cupcakes or as Michelle nicknamed them, ‘Fantastical’ Bug Cupcakes for her granddaughter’s first birthday party. Ava is as cute as a button and deserved to be surprised with her fantasy sugar paste butterflies, ladybugs, dragonflies, worms and bees all in soft shades of pastel pink, blue, yellow and green.

Cute Bug Cupcakes

As usual, I was so touched by Michelle’s thank you message to me….

“Ava couldn’t stop squealing with delight when she saw her ‘fantastical’ bug birthday cupcakes . . . one very happy tiny customer! Once again a huge thank you from our family for adding the ‘sparkle’ to yet another of our gatherings. No celebration would be the same without your creative talent setting the theme and adding just the right amount of whimsy. A flutter of butterfly thank you kisses from all of us.”

Cute Bug CupcakesCute Bug CupcakesCute Bug Cupcakes

Two ‘bees in a pod’ below resting sweetly on their fantasy leaves, cute pink and yellow butterflies with their embossed wings and cheeky snails completed this array of baby insects for Ava’s cupcakes.

Cute Bug CupcakesCute Bug Cupcakes

My thank you from Candy and Ava…

“I just wanted to thank you for making the most incredible cupcakes for Ava’s first birthday. You really are phenomenal and they added ‘sparkle’ to a very special day! Thanks again, love Candy and Ava”

Cute Bug CupcakesCute Bug Cupcakes

Sweet Succulent Cupcakes

Succulent Cupcakes

Just a quick few photos of Succulent Cupcakes I made recently for a client. I always love making these sugar succulents as they are fun to recreate. I added crushed Oreo biscuits to the swirls of buttercream to give a soil effect before adding the sugar plants. They never seem to go out of fashion!

Succulent CupcakesSucculent Cupcakes